

Jeremy Hunt
-
Posts
563 -
Joined
-
Last visited
Content Type
Profiles
Forums
Blogs
Events
Articles
Video Feed
Gallery
Everything posted by Jeremy Hunt
-
Hunt's High Water Sculpin Recipe: Hook: TMC 7999, 1/0 or 2/0 Thread: Danville 210, color to match body Eyes: Metz Eyes Foam: 2MM tied on the bend of the hook, or hard mason mono in 30 pound- Tail: Barred Rabbit from Hareline, Olive Body: Select Marabou, Bucktail Pec Fins: Barred Marabou from Hareline Head: Wool Copyright 2009 ,Patent Pending So last year as some of you know I really went gun-ho on the streamer fishing. I knew the White River was built for this. If you ask me, I wouldn’t want to throw indicator rigs or dries because this river is a whole other ball game. Sure, those things work, but remember I said, built for. This river is all about big browns and there is a way to only target this species. Yes, you won't play the numbers game, but that’s not what it's about. It’s about that one fish. Big flies are what they’re after and that’s what I think triggers the other side of their brain. I know for a fact there are tons of sculpins in this water because I’ve seen them by the hundreds up at the dam in low water after a heavy generation. After playing around with several articulated patterns and tying with marabou by the boat load. I started thinking about a good streamer that would imitate these bigger sculpins, but still keep the movement and the profile. I also know that most bigger fish would hit the front hook instead of the back hook, which tells me they are attacking it from the head, trying to kill it. So when coming up with this pattern I thought about all those things. You could and I have put a trailer on this pattern, but really you don’t need it. You can also tie this fly keeled style and make it ride directly on the bottom, other ways to tweek the pattern. The way I tie is the way I like it and it works for what I’m trying to accomplish. Something buggy in the water and has a big profile to entice a big trout. Because we are relying on sinking heads (275-450 grain) that have 30-40 foot heads this is why we don’t worry about weighting the hook as much. This is the way the industry is evolving. (A whole other subject which will be what I talk about on my newsletter article, switch rods and streamer rod). Here's the article- What’s evolving in the fly fishing world you ask? Switch Rods & Streamer Rods So lets talk a little bit about switch rods and the correct streamer rods with the right outfitted lines that go with them. I don’t know everything, but I’ll tell you what I know from experimenting with them in the last year. So from what I’m gathering from what the fly fishing industry side of it is doing is making shooting line be the prime staple for casting. The concept has always been false casting then shoot line, but now it’s about one cast and then shoot the rest. In other words, get it out in a hurry. And that’s important when burning (stripping) streamers along the banks. Same with the switch rod. This was designed for making huge swings in the current with streamers. They’re several other ways to fish it, but really for around here this is what I’m doing with them. Also because of how the concept was designed you really don’t feel the weight of the flies like you would if you were throwing them on floating wt. forward fly lines. It’s almost a following of what they do in conventional fishing, the weight of the lure will carry the rest of the line out the reel. Same thing here. Switch rods have a shooing head which is fatter on the front part of the fly line and the rest is running line is skinny. Of course you have to learn how to shoot line to really understand the fundamentals of applying a whole new concept to shooting line. What they’re doing now is NOT applying the same power on both casting sides like they do when false casting. Now it’s about a back cast then put all the power on the forward cast to launch a lot more line in one cast. It will really change the way you look at casting big flies and getting wore out doing it over a course of several days. To me, this is a lot easier and if you really understand the load time on when to come back the other direction the line will shoot like a rocket. From teaching casters who have never done this the one thing I see wrong the most is when to get the right projection to shoot. Like false casting then lay down the last cast to present the presentation with a regular weight forward fly line. This way is more about shooting line so the projection is upright for example shooting a cannon. Rod weights are another thing to consider when outfitting them correctly. I have several rods that I throw with streamers, but the most important thing would be what rod will equal the balance of the heavy weight grains that are out there. I have found for a 275 grain you would want a 7wt, for a 350 you would want a 8wt, and for 450 you would throw a 9wt. I’m sure some people would disagree with this theory, but take it from me, I broke several rods from being to light for the amount of weight I was throwing. If you’re wondering what is a good streamer rod, well…there’s a ton out there, but for me I’m not going to spend big money for a rod that pretty much is a broom stick anyways, and most of them are when you get into 8wt and above. I throw the TFO Axiom which has great action, stiff just the way I like it. If you’re throwing rods that have give in them, it’s not enough bone to penetrate the hook in the fishes mouth. And once browns get over 25 inches the mouth becomes really hard. This is all the rod you need. The other rod I’m throwing is the 10ft Teeny rods. Both great rods and the return from getting them repaired is the fastest in the industry. Switch rods are another big deal. I really don’t use mine for spey type casting, but for roll casting and getting your line out there in a hurry this is one I use the most. I also use it for throwing big shad patterns on the surface. Just a fun rod to play with if you want to jump into something else verses normal fly rods. If you have a wide river and want to cover a lot of ground with a baitfish or big profile pattern this is the one for you. I don’t own a fly shop so I’m not trying to sell you something. I really just wanted to share what and how the industry is changing. If you would like to know where to get one or more about them send me an email discussing where to find them or if you would like to go out on a trip and learn more about these. Either way it will open your world to a whole other way you look at fly fishing. The End…JH About the pattern A few things that make the fly, Marabou for the action and a wool head to keep the profile shape. I like the barring look and think the more you can have this in the pattern, the more you can create the mottled affect. Changing the color scheme through the fly will also help it. The major colors to think about when tying these are olives and browns. Hareline came out with several barred rabbit colors that have truly revolutionized rabbit to a whole other level. Without it we would be lost on what we can create now to really mimic baitfish patterns or anything big in the water that fish eat. You can have a foul guard for the back so the tail doesn’t twist around, but I have found foam to be a big kicker for more action in the pattern, but also serves the same purpose. Another way to look at how you tie streamer patterns. I also added a little bucktail as a wing to help keep everything in line. Have fun fishing it as I know you will!! Step 1. Prep the eyes. Step 2. Cut a piece of 2mm foam to be the same width as the rabbit hide. You can make it a little wider if you want. Measure it to be a little more than half the length of the hook shank. Step 3. Tie in the tail to be twice the length as the hook shank or a little longer. It needs to be long or the marabou will over take the fly and it won’t look proportioned correctly. Step 4. Tie in the first plume of marabou. You’ll tie it in from the tip. Step 5. Wrap the plume up until you reach the stiff part of the stem. Cut the excess and tie back on the marabou to lay it back instead of flaring out. You’ll repeat this two more times. I also change the second plume to another olive color to create more dimension to the fly. Step 6. This olive is a little smaller then followed up with a sculpin olive color. Repeat the same step. Step 7. Last color, you should be up at the eye when doing the last wrap. Tie back on this one as well. Then we will have room for the pectoral fins and the bucktial, also the wool. Step 8. This material is from Spirit River or Hareline. You’ll use one big nice plume for each side. Step 9. Tie in some bucktail to measure about the end of the hook shank in length. Step 10. So this is where you’ll need a marker to make your own barring on the top section of the wool. This will help keep the barring going all the way down. To learn more about how to in wool click here. When selecting the wool to make the markings lay it on a flat piece of paper and with the broad end just press down and repeat it on both sides. I’m using a prism color marker. I like these the best out of permanent. Step 11. - no pictue- on my site You will do this step three times, two behind the eyes and one in front. You need to tie one on the top and one on the bottom before pulling one back and then the other, you can’t do them at the same time. This picture came out better then the other so I know this one shows more olive (totally different fly). I just wanted you to see how messy it will look before cutting the head to shape. It’s just like stacking deer hair. Step 12. Finish product. Whip finish and glue it. Cutting it to shape might take a few times, but you'll get it, just think cone shape when designing it. Flat bottom with an up angle on the top. Make sure not to cut the barred wool you first tied in.
-
Pine Craw Recipe: Hook: TMC 777SP Thread: GSP 50, Orange Weight: Lead Eyes, Painted color to match Antennae: Flashabou & Sili Legs Claws: Pine Squirrel Body: Pine Squirrel Step 1. Go ahead and attach the thread at the front of the hook. Make a thread base before securing the eyes. I’m using the heaviest eye to get the fly down. As you can tell they are painted a brown/orange to match the overall color of the pattern. Secure them by doing figure eights on both the top and bottom. Step 2. Advance the thread to the bend. Tie in the flashabou first, then the sili legs. The flashabou will be longer then the sili legs. Still be at the bend for your next step. Step 3. Tie in a small ball of dubbing before adding the pinchers. This will help flare them out. The dubbing I’m using is the craw dub by Wapsi, great dubbing by the way. Step 4. Measure two pieces to be 1 ½ times the hook length. Tie them right behind the ball of dubbing. You’ll want to wind back to where the hide is right up on the dubbing. This will help create the flare. Step 5. Now this might be a little confusing at first, but you want to tie this in where the rabbit is going backwards when winding it forward. Notice in the picture the placement. You’ll only tie in a small portion of the hide. If you tie too much down you will see it after you start winding. Step 6. Wind it all the way up and snug it right behind the eye. Keep going, but here in the picture I’m showing you where you can take a breather. Step 7. Now make a figure eight around the eye and one full turn in front. This might take a few times to make sure it’s down right, just play with it and you should figure it out. Step 8. Trim the excess and glue it. Step 9. Cut a different color pine squirrel, or use the same to glue on the other side of the pinchers to make a two sided claw. I like orange and red over all others. This should be a killer pattern for crawdads wherever you fish it.
-
I'm going to make this one. Looking forward to it!
-
Tying a new streamer pattern called Screaming Jesus. Russ Maddin came up with this year. Sick!....that's all I can say. P.S. I have alot of new patterns to share with you coming up real soon. I will add them has how-to-steps.
-
I would call those outlets the same as what the holding tanks are called in the hatchery. Really no skill involved, it's a crap shoot and eventually you will get lucky and hook a big fish. If that's your cup of tea then fine with me, just my opinion. I started there so I'm not knocking it, but you'll grow and get out of there and go explore the "real" world of fly fishing. So much more fun if you ask me.
-
I agree, one I won't forget as well. Thanks for the comments You ask flies, everything. They're not picky at all. They hardest part is getting them to the net because there isn't much room.
-
Nothing wrong with that vid, just the angle of the camera my friend, but if you want to read into it, go ahead. What trout are you talking about, the brown. It was caught way below the cable, the other trout, well that was caught right at the cable at the front of the dam. Great fishing up there and most the big fish live there year round. Try it for yourself next time you're at Taney.
-
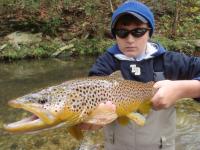
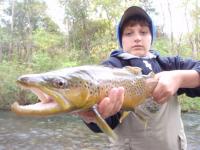
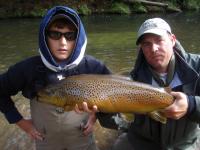
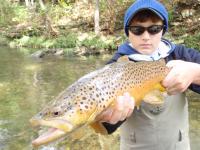
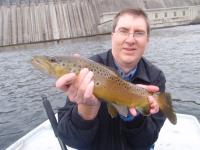
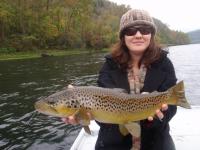
The Norfork recently had some new work done, which I have to give a big shout out to everyone who was involved in this project. They outlined the river bank on our side with big rocks and made it a lot easier to navigate. They still have some work to be done, but the fish are still actively thriving in the creek right now. I would say 70% browns and 30% rainbows with plenty of big fish to go around. Here’s a few pictures of some browns we were able to land. Lost some big fish, but caught a fair share to. Jordan will never be the same.
-
3,500 Th. Guide Trip In The Books For Tr And Taney.
Jeremy Hunt replied to Bill Babler's topic in Upper Lake Taneycomo
I agree. -
3,500 Th. Guide Trip In The Books For Tr And Taney.
Jeremy Hunt replied to Bill Babler's topic in Upper Lake Taneycomo
That's a great looking brown. I used to live next to you in Ballwin. Was that brown caught at Taney? -
3,500 Th. Guide Trip In The Books For Tr And Taney.
Jeremy Hunt replied to Bill Babler's topic in Upper Lake Taneycomo
Yeah, poor some water on the fire. I understand both concerns, but rods broken, that happens and I for one don't mind it and never worry about the small stuff. In the end it's about making EVERY client happy whether they have poo on the shoe or whatever the case may be. I think as guides we are all going to have days like this. It's the nature of the beast. Bill, are you out the whole cost of the rod or do the rods you furnish have warranties? I break probably 15 rods a year, but it's a small fee for the price of admission. I'm not trying to open any can of worms, just curious, really. -
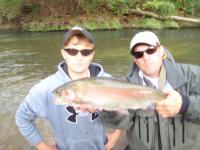
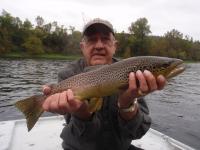
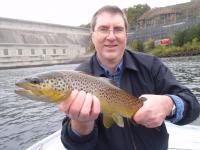
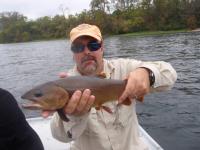
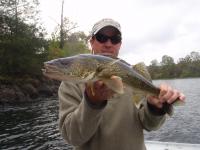
Here's a few more pictures of some of the browns we caught the last two days. The White is fishing great in this water level. Way to go John and Kevin!
-
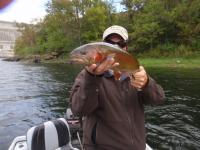
I would say this fish is between 26-28 inches. Here's another vid for everyone to see for yourself.
-
Close, B- up.
-
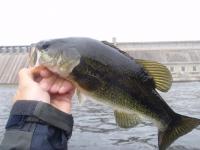
I've been doing a bunch of trips up at the dam, and fishing has been really good. It's been a strange few days of fishing, caught a largemouth one day and the next followed up with a walleye. I guess they like that new structure up there. Summer hasn't fished much, but she was able to hook a really nice brown her first time out in a long time, good for her!! Hope everyone is out doing some fishing
-
Nice Rainbow At Outlet #1 This Morning
Jeremy Hunt replied to Phil Lilley's topic in Upper Lake Taneycomo
It's great to see rainbows like this at Taney. All positive signs on why regulations are important. -
Thanks guys! Yeah, I miss running into some of the people I met over the course of a year. What I miss the most is my backyard, Wildcat to Cotter. I learned alot while I was there, especially streamer fishing. That river is built for it and not to many people know it. The day I fished Rim, we turned five big browns and only catching one out of five. It was Layne's first time, now he doesn't want to fish any other way. That's what streamer fishing does to you. I put the boat in at Taney yesterday, just to scope out what browns we had moving up. Let me tell you, they're here. I saw six browns that were all over 27 inches. One was dragging a indicator ( beacon, lol) around. Dead give away so be looking for him. Ham, we'll have to go fishing.
-
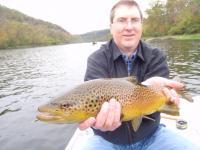
Had some trips over the last three days on the White. Here's the result of some fine fishing. It's brown trout city on all tailwaters, get your hat on tight!


-
It was a lake run, and a female at that. What????????????
-
click here to read the rest of the story
-
This is becoming a little fishy.....
-
Phil, I need some killer caddis beads in x-large in (red) scarlet.
-
Bps Tungsten Beads Breaking
Jeremy Hunt replied to DaddyO's topic in Fly Tying Discussions & Entymology
I’ve had the same problem to and black is definitely the worst by far. Wapsi furnishes BPS with most of what you see unless it’s a Hareline, Spirit River, Orvis or Metz product to name a few. About five years ago the tungsten was a lot better. There is a bead sill floating out there that is a better bead then all the rest, but you have to look for it. I’ll try to take a macro shot and show you the difference in the two beads. To me, the old bead just looks stronger and there seem to be more metal in the bead as a whole. As soon as they went to the big recessed back of the bead they went downhill. If you are shopping out there make sure you try to look for the same diameter hole on the both ends without a big recess back, you’ll have a better bead. -
The walk way is no longer there anymore because of that flood.
-
Night Fishing Report For This Week
Jeremy Hunt replied to Micheal Kyle's topic in Upper Lake Taneycomo
Great report Michael. Thanks for sharing, sounds like your have some luck on mouse patterns to. I've been fishing behind Fall Creek with lots of nice fish. Also, been throwing streamers during the day, trying to dial it in. I'll keep you posted. Like wise on the family, hope everything goes well.


