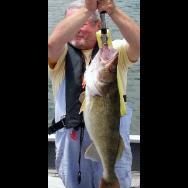
rps Posted May 29, 2014 Author Posted May 29, 2014 Like the full grip for fast baits myself, but without the fore grip. Trick for me on split grips is making sure they fit the user. There is a spot on the arm I like the rear grip to hit, but obviously it varies person to person. A lot of factory splits are too long, or too short to hit that spot. To have someone else build a split rod for you, you would really need to provide measurements of the forearm. Would help get the butt grip and the reel seat area placed correctly. That TN handle is fat. Full rings, just barely turned down. Fills the hand and prevents "squeezing" the rod, which causes fatigue, wrist/elbow pain, and muscle cramping over a long day. What you say here is EXACTLY why I built the Tennessee handle the way I did. The best medium or light rod I ever had for big fish was a Falcon with a Tennessee handle this long. It tucked under my right forearm perfectly to provide leverage. Why I let it go into a garage sale is beyond me. In the words of Joni Mitchell, "you don't know what you have until it's gone." Today I caught a very feisty 2.5 pound fish on the new rod and the handle tucked in perfectly. I am ready to test it against larger fish.
5bites Posted May 29, 2014 Posted May 29, 2014 One way to cut costs on your very first rod is to take a rod you kinda like, strip it down, and make it better. I did this for my first. I'd be glad to help but Carthage is a haul for you.
Gavin Posted May 29, 2014 Posted May 29, 2014 You can cut a couple v-notches in a cardboard box and make a wrapping stand..use a book for thread tension, toss the spool in a bowl. A friend with a metal lathe might allow you to spin your own grips, but you will need a jig or two to keep the tip from flying around and breaking off. Go with a premade grip for your first several. A friend has an old Clemens powered rod wrapper that he allows me to use to spin grips.
dtrs5kprs Posted May 30, 2014 Posted May 30, 2014 You can also turn grips with a little hillbilly ingenuity, a hand drill, and some various sizes of dowel rod for mandrels. The TN and rear grips on the split grip rod above were turned that way, without being mounted on the blank. Glue up, ream to fit, then turn. My wife and kids did give me a Flexcoat drill powered lathe, but have not had a chance to use it yet. Will probably still use mandrels with it. Not big on the idea of spinning the blank with grit and sanding materials near it.
5bites Posted May 30, 2014 Posted May 30, 2014 I'll be curious of your opinion on the flex coat drill. I've used just a drill with all thread before. It worked but there are better ways.
dtrs5kprs Posted May 30, 2014 Posted May 30, 2014 Will probably fire it up in July. Will let you know how it goes. Watched several videos with it. Certainly decreases the time involved, but hope it does not remove the ability to "feel" the grip taking the right shape.
REDSOXWSCHAMP Posted May 30, 2014 Posted May 30, 2014 I would just like to build a rod, the way i want it, and to have the satisfaction of catching fish with something i made. I found some rod kits in the mudhole catalog, didn't know if it was worth it to buy one of those kits.
rps Posted May 30, 2014 Author Posted May 30, 2014 I would just like to build a rod, the way i want it, and to have the satisfaction of catching fish with something i made. I found some rod kits in the mudhole catalog, didn't know if it was worth it to buy one of those kits. Spinning or baitcast? Application and length and action preferences? Full or split grip? The people on this board can help you get it just the way you want without a kit. The kits are good, but usually contain larger guides and may or may not have the correct number of guides for your desired application/action. If you start with good components and go to youtube for guidance, you can make a product that will please you. Gavin is correct about the cut down cardboard box, book tensioner, and coffee cup thread holder. That is the way I made my first rod in the early 1970's. To save buying the turning motor or stand with motor, you will need to turn the rod a quarter turn every 10 to 15 minutes for several hours. Some quick lessons learned the hard way: Do not use a brush to apply the thread epoxy, carefully measure any two part epoxy and thoroughly mix it using slow swirls that do not incorporate air into the mix, pack your wraps often and tightly, measure three times and cut once. Good luck.
REDSOXWSCHAMP Posted May 30, 2014 Posted May 30, 2014 I'm leaning towards a spinning rod, something to use for a dropshot/split shot. I prefer at least a 7' rod most of the time. I would probably go with a full grip,as i'm going to start wrapping my handles with lizard skins.
5bites Posted May 30, 2014 Posted May 30, 2014 Mine and rps' method differs some. I use brushes. If you let the finish work for you by leveling itself brushes are fine. Also, and I know rps knows this, if you waited 10 minutes to turn the rod when you first apply the finish you'll end up with finish on your counter. You have to watch for sags then rotate. I do half turns. My method (everyone's is different) is as follows: Mix finish for 2.5-3 minutes Apply finish to the guides. First coat is thin and is basically just to soak into the thread. Usually I don't worry about getting it to overlap onto the blank on the first coat. I move to the logo area if that rod has one. I apply finish the length of the area just as I would if it had thread not caring how even it is. Then I make length wise strokes to level it out some. I touch up any dry areas and fill holes that are around the guide feet. You can do this on the second coat if you want. I also use this time to apply heat to areas (via alcohol lamp) that may have bubbles. Then I let the rod sit still so the finish starts to sag. Rotate half way. Let it sag slightly again. Rotate half way again. I just do this by feel. It will level everything out nicely. When I'm satisfied I slap it in my 9rpm flexcoat drier. Let it set at least 3 hours before applying another coat. Now for rotating the rod by hand while applying the finish is just fine. Rest your hand on something to steady it. I use a turned over coffee mug. I have a 20rpmish rotisseri motor that I use while applying finish then move to the 9r motor for it to dry. A faster motor lets you get more even lines at the end of your finish. I've actually been aiming to buy a better setup than my home made contraption but haven't. Anyway right or wrong this is my method. Everyone else on here does it different from me I'm sure and likely different than eachother. I've got some refining to do and things to buy but no more than I've built the last few years I don't worry about it much. Another option to consider is to just have what you have in mind made. Spend the money you'd spend on equipment on a rod built by another builder. I've thought more than once that may have been a better solution. Though I'll add it is satisfying to see your finished product, your creativity and design, then apply it. You can create your own actions by extending or shortening blanks. That opens a new window that others won't know about unless you tell them. It allows you to really build a technique specific rod.

Recommended Posts
Create an account or sign in to comment
You need to be a member in order to leave a comment
Create an account
Sign up for a new account in our community. It's easy!
Register a new accountSign in
Already have an account? Sign in here.
Sign In Now