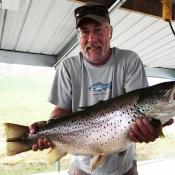
duckydoty Posted July 21, 2018 Share Posted July 21, 2018 I have started to paint jerkbaits for big browns. Now, I am completely new to this and just diving right in head first. I purchased a fairly cheap complete airbrush kit from Hobby Lobby, water based acrylic paints, powdered mica pearl pigments, and 2 part epoxy clear coat as recommended by our very own Mr. Billethead. Thanks Marty! Been gathering various jerkbait blanks from different suppliers looking for ones I can get to suspend. I’ve been trying my hand at two different color schemes and feel like I’m starting to get them dialed in. My ultimate goal is to get a rainbow trout and brown trout pattern dial in but I’m a long ways off from that yet. It has been an enjoyable way to spend what little spare time I have this time of year sucking up some AC and staying out of the heat. This post has been promoted to an article BilletHead, nomolites, trythisonemv and 5 others 8 A Little Rain Won't Hurt Them Fish.....They're Already Wet!! Visit my website at.. Ozark Trout Runners Link to comment Share on other sites More sharing options...
Quillback Posted July 21, 2018 Share Posted July 21, 2018 I'll be curious to hear what your opinions are on the various blanks as far as which ones fish the best. Link to comment Share on other sites More sharing options...
Flysmallie Posted July 21, 2018 Share Posted July 21, 2018 1 hour ago, Quillback said: I'll be curious to hear what your opinions are on the various blanks as far as which ones fish the best. Yes to this. Link to comment Share on other sites More sharing options...
duckydoty Posted July 21, 2018 Author Share Posted July 21, 2018 So far I really like the Jann’s Netcraft TMJ 90. It suspends well and has been catching a few good browns. Problem is, they are now out of stock after I purchased 27 of them. Also they are unavailable for back order. Can not find a 90 anywhere else but have found some 95’s. Got a few painted but have not had a chance to see if I can get them to suspend or see how they fish yet. Quillback 1 A Little Rain Won't Hurt Them Fish.....They're Already Wet!! Visit my website at.. Ozark Trout Runners Link to comment Share on other sites More sharing options...
BilletHead Posted July 21, 2018 Share Posted July 21, 2018 Nice Friend, The bbq rotisserie is the bomb! Are you signing your baits? You should incase someone lucky finds them . BilletHead Deadstream, Daryk Campbell Sr, patfish and 2 others 3 2 "We have met the enemy and it is us", Pogo If you compete with your fellow anglers, you become their competitor, If you help them you become their friend" Lefty Kreh " Never display your knowledge, you only share it" Lefty Kreh "Eat more bass and there will be more room for walleye to grow!" BilletHead " One thing in life is for sure. If you are careful you can straddle the barbed wire fence but make one mistake and you will be hurting" BilletHead P.S. "May your fences be short or hope you have long legs" BilletHead Link to comment Share on other sites More sharing options...
Flysmallie Posted July 21, 2018 Share Posted July 21, 2018 Yep the rotisserie is freaking awesome! If you ever have any special color needs let me know. duckydoty and Deadstream 2 Link to comment Share on other sites More sharing options...
ness Posted July 22, 2018 Share Posted July 22, 2018 This is one of those 'Why didn't I think of that?' moments. Love the BBQ rotisserie!! Looking forward to seeing some of the finished products. Deadstream 1 John Link to comment Share on other sites More sharing options...
duckydoty Posted July 22, 2018 Author Share Posted July 22, 2018 Here are some of the tips that I have so far to help flatten out the learning curve with airbrushing lures and applying 2 part epoxy. Use high performance reducer to thin water based acrylic paints to the consistency of 2 % milk. Apply coats in light layers and heat set with hair dryer to speed up drying process. Mix powdered mica pigments with a balancing clear and reduce with high performance reducer. Powdered pigments are much more effective over a dark base layer than a light colored base. Use many more light coats of powdered pigments when covering light colored base and heat set with hair dryer between coats. Keep air brush clean! Use a windex/water mixture for cleaning. A rotating fly tying vise makes a great lure holder for painting. Blue painters tape masks off bait bills and eyes and is easy to remove once bait is dry. PearlEx interference blue is really cool stuff! 2 part slow cure epoxy is really thick and starts to set way faster that I would like. Slow the process down by mixing on a paper plate covered with aluminum foil. Add 5 drops of denatured alcohol to mixture to help thin a bit and add again if mixture starts to set before you are ready. Apply mixture to lure with brush while lure is still in rotating vise. Use gentle heat from hair dryer to thin and flatten epoxy on lure while using brush to remove excess. Rotisserie spins about 6rpm which is perfect for drying and curing epoxy top coat. Clean brush with denatured alcohol so you can use again. Seth, ness, Daryk Campbell Sr and 4 others 7 A Little Rain Won't Hurt Them Fish.....They're Already Wet!! Visit my website at.. Ozark Trout Runners Link to comment Share on other sites More sharing options...
Al Agnew Posted July 23, 2018 Share Posted July 23, 2018 14 hours ago, duckydoty said: Here are some of the tips that I have so far to help flatten out the learning curve with airbrushing lures and applying 2 part epoxy. Use high performance reducer to thin water based acrylic paints to the consistency of 2 % milk. Apply coats in light layers and heat set with hair dryer to speed up drying process. Mix powdered mica pigments with a balancing clear and reduce with high performance reducer. Powdered pigments are much more effective over a dark base layer than a light colored base. Use many more light coats of powdered pigments when covering light colored base and heat set with hair dryer between coats. Keep air brush clean! Use a windex/water mixture for cleaning. A rotating fly tying vise makes a great lure holder for painting. Blue painters tape masks off bait bills and eyes and is easy to remove once bait is dry. PearlEx interference blue is really cool stuff! 2 part slow cure epoxy is really thick and starts to set way faster that I would like. Slow the process down by mixing on a paper plate covered with aluminum foil. Add 5 drops of denatured alcohol to mixture to help thin a bit and add again if mixture starts to set before you are ready. Apply mixture to lure with brush while lure is still in rotating vise. Use gentle heat from hair dryer to thin and flatten epoxy on lure while using brush to remove excess. Rotisserie spins about 6rpm which is perfect for drying and curing epoxy top coat. Clean brush with denatured alcohol so you can use again. Great tips! But you can also just do it as I do...buy cans of spray enamel at a big box store, use a couple simple masks, practice a bit until you can barely touch the spray button to make the paint sputter instead of spray for certain effects, use a couple different size nails for eyes, and finish off with a couple coats of polyurethane marine spray varnish. I spend enough time doing all the detail in my paintings, I don't want to spend a ton of time and do all kinds of elaborate things to paint fishing lures when I don't really think it makes a difference to the fish. I don't want to have to clean the airbrush all the time, either. Been there, done that. Don't get me wrong, I admire a great paint job on a fishing lure. I think it's really cool if that's what you're into. But I make lures down and dirty to use to catch fish, and as long as they work I'm fine with the paint job. Link to comment Share on other sites More sharing options...
Flysmallie Posted July 23, 2018 Share Posted July 23, 2018 You can also just use sharpies. I won a tournament in Pomme de Terre one time on hand painted crankbaits. Caught some fish prefishing in a certain color and couldn’t find any others that color. So we headed to Walmart in Bolivar and bought some nail polish and painted them that night in the room. But a airbrush is so much easier to use. patfish 1 Link to comment Share on other sites More sharing options...

Recommended Posts
Create an account or sign in to comment
You need to be a member in order to leave a comment
Create an account
Sign up for a new account in our community. It's easy!
Register a new accountSign in
Already have an account? Sign in here.
Sign In Now